Wednesday, 22 June 2011

Super Lola cape...

When I was pregnant, we asked Lola if she thought the baby might bring her a present... Lola excitedly exclaimed that the baby was bringing her a super hero cape!

Well, that baby is now over six months, but at last Lola has her cape!


although she's more excited about the dribble bib I made for her baby doll!


Saturday, 18 June 2011

to make a photo look like a sketch

I can't draw, even my stick men look suicidal - but I've found a super quick 2 minute way to make photos look like a hand drawn sketch. (I'm using Photoshop 7)

First choose your image - here is mine

Lola, aged 2


Now, duplicate your back ground image - press CTRL + J


Press Shift+Ctrl+U to desaturate the layer
Now your picture will be black and white - pretty eh?


Now press CTRL + J again to duplicate the desaturated layer
you should now have 3 layers...


Press Ctrl+I to invert the layer


Press Shift+Alt+D to change the blend mode to Colour Dodge

your picture will look like it's gone, but don't fret - 


Go to Filter > Other > Minimum. Leave the Radius value set to 1 pixel and click OK to close out of the filter's dialog box


 now,
Press Shift+Alt+Ctrl+E 


this merges the layers onto a new layer above the others

Press Shift+Alt+M to change the blend mode of the merged layer to Multiply, which darkens the sketch effect.

Lower the layer Opacity value if the sketch now appears too dark.
see where highlighted

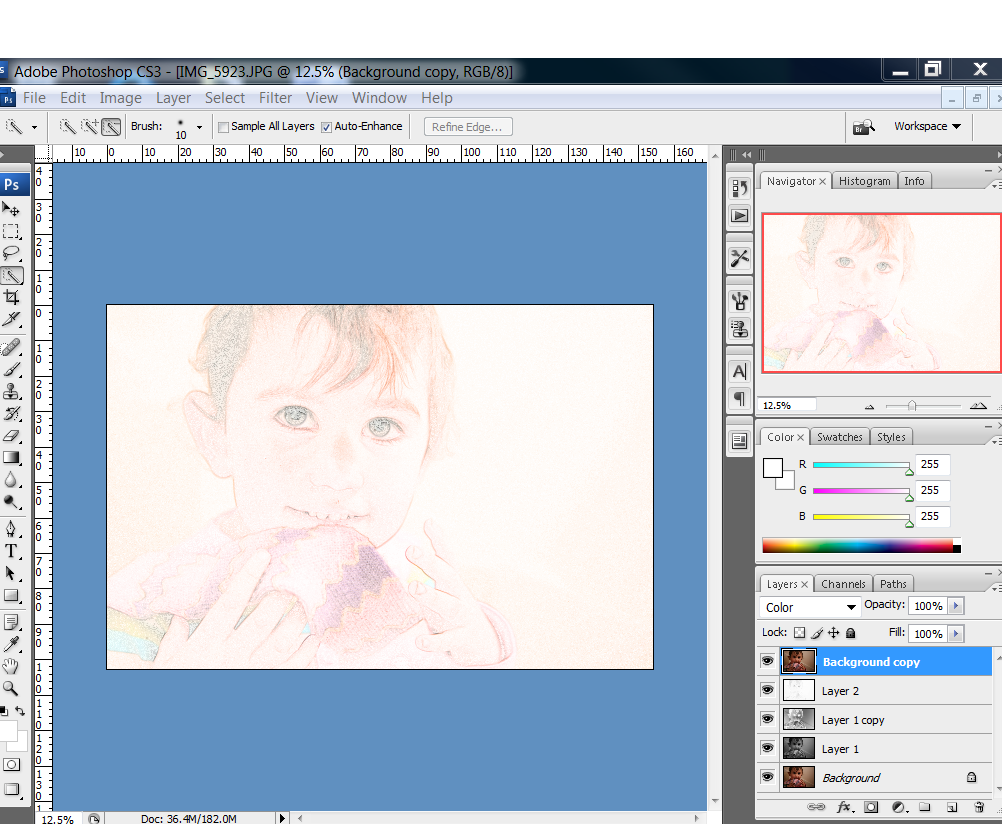
Click on the Background layer in the Layers panel to select it, then press Ctrl+J to duplicate it.


Press Shift+Ctrl+] to jump the Background copy layer to the top of the layer stack.

Press Shift+Alt+C to change the blend mode to Colour to colour the sketch

Lower the Opacity value to reduce the intensity of the color if needed.
finished


there... all done

done

Friday, 17 June 2011

my pictures (by request)

as requested by The Dr's Wife from Mumsnet, here is a simple tutorial -


Choose your picture you want to use. I have chosen a photo of Lola, in Aberystwyth out side the camera obscurer. 


Find your pen tool for quick selection and highlight the area you want (you may need to use the magic eraser tool to sharpen up edges)

Press ctrl, alt and J – this makes your selection on another layer


Rename your selected area on the new layer as THRESHOLD – you’ll see why in a bit


Now you should have two layers, one called BACKGROUND and one THRESHOLD


Now that we have the main subject on its own layer, we're going to hide the background from view and replace it with a solid colour


First, click on the Background layer to select it. Then, with the Background layer selected, click on the New Fill Or Adjustment Layer icon at the bottom of the Layers palette:


 Choose a colour you like 

You will now have a solid colour as your back ground 


Next we need to convert the main subject to black and white and remove most of the detail, and we can do that easily using photoshop’s Threshold adjustment. First, click back on the "threshold" layer to select it in the Layers palette. Then, go up to the Image menu at the top of the screen, select Adjustments, and then select Threshold. This brings up the Threshold dialog box:


Decide what threshold your picture looks best at, then you may like to play around with the back ground effects to create shadows / patterns etc


this is by far not the best, but a quick demo - it's rather simple
finished


these are ones I've done before 


See – simple!

a blanket for my new nephew

The 10th Grand Child was born yesterday! Christmas is going to be costly this year!

I saw this blanket on Sew Much Ado, and decided it would be a good light weight blanket for a summer baby like Oscar!


So I appliquéd on the letters – I didn’t have any bondaweb, but the lovely lady at  so resourceful gave me some handy tips :)

 I love the ricrac - at the fabric shop they have drawers and drawers of it, in hundreds of different colours.

Any way, I really hope my brother and sister in law like it, and it's useful!

Thursday, 16 June 2011

a phone case for my sister

My sister asked me to make her some thing to keep her phone safe in her pocket

(although I would like to point out that this won't protect it from being dropped in puddles Lu).


It was relatively easy to construct once I had figured out where to attach the flap while sewing in the lining - so it didn't get trapped in between the two layers when the case was pulled the right way round. I will write a tutorial for this and add it later on.

fits my iphone 4

finished!!   

Wednesday, 15 June 2011

Birds

Well this is the project that broke my sewing machine a few weeks ago. I was very very upset that my machine kept eating my things!! It has now been serviced (at great expense!) and is working better than ever.


cutting out the pattern

my daughter has adopted this as her bird


these were going to be used to make a mobile for my younger baby, sadly all the pieces haven't been put together, maybe I will get round to it. At the moment I just have lots of birds :)

I have a plan for these, and will be using them when I decorate my children's bedroom soon!

my first wallet

I've been searching for a while to find a design that would suit me, and finally my first ever finished wallet has been made. I love it!!
here is the finished wallet

the inside card slots, during the making process

lots of compartments

the finished inside

I'm really happy I made this now, even though it's made from the scraps from other projects. Lots of my friends now want ones just the same. I got the tutorial from  Confessions of a Fabricaholic who is clearly a very clever lady! I blame So Resourceful for sparking my need to make one!!

So this afternoon I'm off to my local fabric store to stock up - I have lots of things on my to do list :)